Restore AD Object from the AD snapshot in Server 2008
Frnz,
Today i will share "how to recover the deleted objects from AD snapshot in Server 2008
and Server 2008 R2.
This is also very nice feature.In the previous version of windows if you have accidently
deleted an object from AD then you need to perform couple of task to recover that,
and that also require you to reboot the DC.
But with the newer version of windows 2008 and 2008 R2 there are couple of features
included in these, and AD snapshot and Recycle Bin are the one of the feature.
In this blog I will share how to recover deleted object with AD snapshot.
So you have a AD environment and you have users in that.Assume you have scenerio
like below.Here you have two users vijay and t1.

Now you need create a AD snapshot. To do that follow the following steps.
Step1: Go to command prompt and type
C:\ntdsutil
Step2: Now type snapshot
ntdsutil: snapshot
Step3: Now you need activate AD instance,to do this type
snapshot: activate instance ntds
Step4: Now instance is activated ,you need to create the snapshot
snapshot: create
Creating snapshot...
Snapshot set {59738915-f3f2-4919-8769-f7379911c4f6} generated successfully.
Step5: Now the instance is created but you need to mount it.to do this
snapshot: mount {59738915-f3f2-4919-8769-f7379911c4f6}
Snapshot {33d4ede5-c094-41b9-8e42-421df7b1d667} mounted as
C:\$SNAP_201108040529 _VOLUMEC$\
snapshot:
It will mount the created snapshot to C:\$SNAP_201108040529 _VOLUMEC$\
Step6: Now you need to connect the newly created instance with some different
port number. To do this type
dsamain -dbpath C:\$SNAP_201108040529_VOLUMEC$\windows\NTDS\NTDS.Dit -ldapport 15389
here blue portion is where the instance mounted and purple portion represent
the port on which this instance will connect.
Step7: Now you have two AD instance
1. One on port 389 (not having users t1 and vijay)
2. Second is on port 15389 (having both the users t1 and vijay)
Open the first one using dsa.msc with the default port 389
Open the second one using dsa.msc and then connect to domain controller and
mentioned the FQDN with the posrt 15389.
Now you will have two mmc opened as shown below.

Step8:- Now you can recover the object either using ldp.exe tool or some other tool
I have got a very small and easy command tool to recover the objects i.e oirecmgr.exe
You can download this tool from here
Step9:- After downloading this tool just extract in some folder say c:\ drive
Step10:-Run the following command to recover the object but to run this command you
need to get the GUID of the deleted user.
C:\oirecmgr.exe -o fe6a3c0f-5e15-4022-b076-eacac4e1a23e -sh test.local:15389 -ol -real
>>Here red portion is GUID of the object and blue portion is the snapshot
connected to port 15389
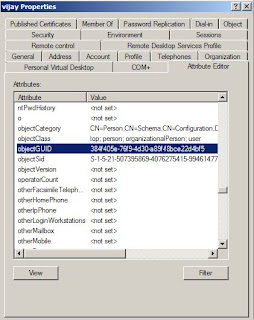
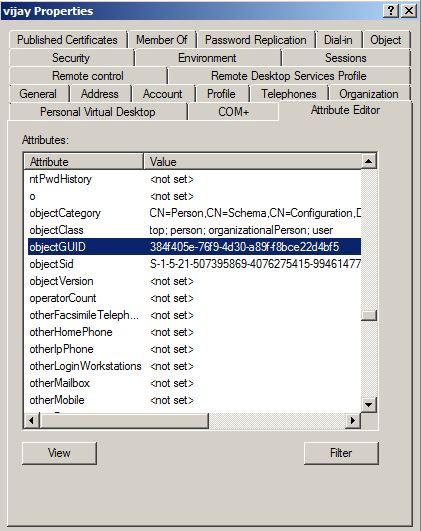
To get the GUID of the user you can use ADSI Edit .Open Adsi Edit and then
 Right click on Adsi Edit and connect to , A box will open then go to Advanced
Now add the port 15389 and then click on OK
Now go to the OU and open the properties of deleted user say vijay.
After running the above command the deleted object will be recovered.
Frnz,
Today i will share "how to recover the deleted objects from AD snapshot in Server 2008
and Server 2008 R2.
This is also very nice feature.In the previous version of windows if you have accidently
deleted an object from AD then you need to perform couple of task to recover that,
and that also require you to reboot the DC.
But with the newer version of windows 2008 and 2008 R2 there are couple of features
included in these, and AD snapshot and Recycle Bin are the one of the feature.
In this blog I will share how to recover deleted object with AD snapshot.
So you have a AD environment and you have users in that.Assume you have scenerio
like below.Here you have two users vijay and t1.

Now you need create a AD snapshot. To do that follow the following steps.
Step1: Go to command prompt and type
C:\ntdsutil
Step2: Now type snapshot
ntdsutil: snapshot
Step3: Now you need activate AD instance,to do this type
snapshot: activate instance ntds
Step4: Now instance is activated ,you need to create the snapshot
snapshot: create
Creating snapshot...
Snapshot set {59738915-f3f2-4919-8769-f7379911c4f6} generated successfully.
Step5: Now the instance is created but you need to mount it.to do this
snapshot: mount {59738915-f3f2-4919-8769-f7379911c4f6}
Snapshot {33d4ede5-c094-41b9-8e42-421df7b1d667} mounted as
C:\$SNAP_201108040529 _VOLUMEC$\
snapshot:
It will mount the created snapshot to C:\$SNAP_201108040529 _VOLUMEC$\
Step6: Now you need to connect the newly created instance with some different
port number. To do this type
dsamain -dbpath C:\$SNAP_201108040529_VOLUMEC$\windows\NTDS\NTDS.Dit -ldapport 15389
here blue portion is where the instance mounted and purple portion represent
the port on which this instance will connect.
Step7: Now you have two AD instance
1. One on port 389 (not having users t1 and vijay)
2. Second is on port 15389 (having both the users t1 and vijay)
Open the first one using dsa.msc with the default port 389
Open the second one using dsa.msc and then connect to domain controller and
mentioned the FQDN with the posrt 15389.
Now you will have two mmc opened as shown below.

Step8:- Now you can recover the object either using ldp.exe tool or some other tool
I have got a very small and easy command tool to recover the objects i.e oirecmgr.exe
You can download this tool from here
Step9:- After downloading this tool just extract in some folder say c:\ drive
Step10:-Run the following command to recover the object but to run this command you
need to get the GUID of the deleted user.
C:\oirecmgr.exe -o fe6a3c0f-5e15-4022-b076-eacac4e1a23e -sh test.local:15389 -ol -real
>>Here red portion is GUID of the object and blue portion is the snapshot
connected to port 15389
To get the GUID of the user you can use ADSI Edit .Open Adsi Edit and then

Now add the port 15389 and then click on OK
Now go to the OU and open the properties of deleted user say vijay.
After running the above command the deleted object will be recovered.